Page History
...
- In most cases, items will be aligned according to the outermost element (for example, if you choose align left, the elements will align to the leftmost item among the selected group; if you choose align top, all items will align to the topmost element.)
- Align center arranges the elements along the horizontal center of the selected elements; align middle aligns the elements to the vertical middle of the selected elements.
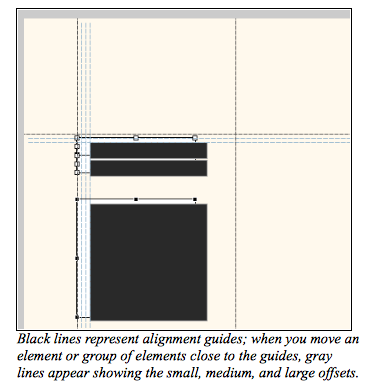
You can also use alignment guides to align elements:
- Click on the horizontal or vertical ruler to create an alignment guide.
- A ruler mark will appear, which you can drag left or right (horizontal ruler) or up and down (vertical ruler) to the location that you would like to use.
- You can change the ruler units by accessing the Preferences pane from the contextual menu (right-click)
2. Select the items you want to align and drag them towards the alignment guide.
- The default snap-to-guide threshold is 3px.
- You will see small, medium, and large offset guides as you drag the items towards the alignment guide. The default offsets are 5, 10, and 15 px respectively (see image below). These offsets can be modified via the Preferences pane in the contextual menu.
Setting Space Distribution
The Distribute toolbar contains buttons for setting space distribution of selected elements. To distribute elements equally:
- Select a group of elements that you wish to distribute by click-dragging a selection box around them, or by holding down the CTRL key while clicking on each element.
- Click on the appropriate Distribute button on the toolbar.
- Items can be equally distributed based on horizontal/vertical spacing between element edges or element centers:
- Vertical Spacing creates equal spaces between elements, keeping the topmost and bottom elements' vertical position fixed.
- Vertical Centers creates equal spaces between the vertical center of each element.
- Items can also be distributed equally from the left or from the top
- Leftward creates equal spaces between elements while bringing items to the left.
- Upward creates equal spaces between elements while bringing items to the top.
Note: The default spacing for these two options can be changed by accessing Preferences in the contextual menu and setting the Small Offset value to the desired spacing.
Setting Element Sizes
The Same Size toolbar allows you to set the same width (1) or same height (2) for the a group of selected elements.
To set the same width or height:
- Select a group of elements that you wish to set to the same height or weight by click-dragging a selection box around them, or by holding down the CTRL key while clicking on each element.
- Click on the appropriate button on the Same Size toolbar.
Note: If you have "Show same-size indicators" active (you can change this setting via the Toggle toolbar), elements with the same width will have a vertical bar on the top left corner when an item is selected. Conversely, elements with the same height will have a horizontal bar on the top right corner, as seen in the figure below: 
Setting Element Anchors
Anchor settings determine how the layout of elements change when an end-user resizes the application window.
- By default, elements placed on a form are anchored to the left and to the top---meaning that their position is fixed to the left and the top.
- Elements can also be anchored to the bottom or to the right, which will give the elements a fixed position relative to those settings.
Visualizing the Anchoring Indicators
The Toggle toolbar allows you to visualize anchoring indicators, which can then be used to modify anchoring settings for an element.
The anchoring indicator appears as a gray box to the top right of the selected element.
Setting the Anchoring Property
To set the desired anchoring option:
- Click on the gray box to reveal the menu.
- Select your anchoring preferences from the drop-down list (see image below).
Note: If you want the elements to grow or shrink when the window is resized, you need to set opposite anchors (for exampleSetting Element Sizes, anchor TOP,LEFT; or anchor BOTTOM, RIGHT).
Overview
Content Tools
Activity