Page History
...
The data for internationalization is saved in the workspace under the Resources project. The table is then exported with the solution when the solution is deployed to the application server .
To view and edit an i18n table:
- In Solution Explorer, under the Resources project, click on the i18n files node.
- Double-click on the i18n file you wish to access in the contextual list at the bottom of the Solution Explorer. It will open in Table Editor view.
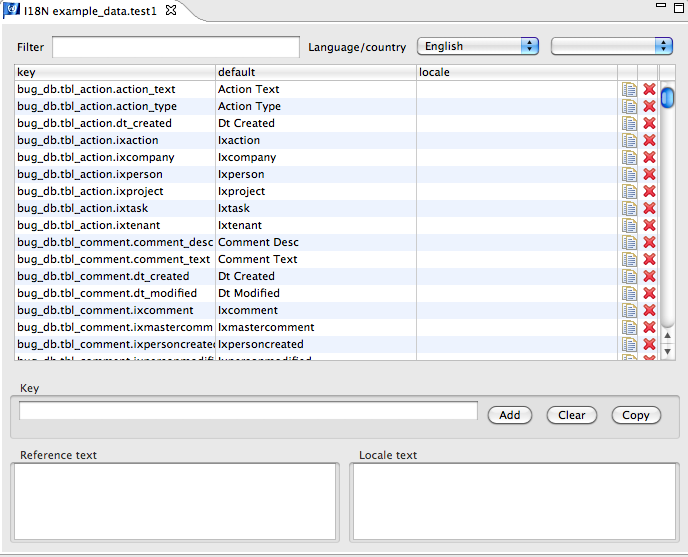
- Along the top of this view is a filter that enables users to quickly find a i18n key. The next two items at the top are the Language and Country drop-downs. To edit an i18n key:
- Select the key and the language/country you wish to edit.
- Click on the desired i18n key from the list.
- Enter the reference text (which is the default language text) and the locale text appropriate to that language/country.
- To add a new i18n key:
- Type in a name for the new key in the Key text box.
- Enter the reference text and the locale text in their respective boxes.
- Click Add.
(if Export i18n data is checked in the Solution Export wizard).
Defining an i18n Table for a Solution
To add internationalization to your a solution, an i18n table needs to be associated with the solution. You will be prompted A message dialog will prompt the developer to do this when you first add adding internationalization to a solution using either of the two available methods: (1) externalizing all the available text in a solution or (2) adding i18n messages one by one to your forms/scripts (see image below of i18n buttons in main toolbar). 
- Externalize Strings – This option creates a list of all the items in your the active solution that are available for internationalization and automatically creates corresponding i18n keys and messages.
- Edit i18n messagesI18N Messages – This option opens the defined i18n table for you the developer to individually add i18n keys and their associated text. You The keys can then add the keys be added to the appropriate objects in a form or script.
- Click on Choose either button way to add internationalization to your the active solution. The following window will appear, if an i18n table has not been defined
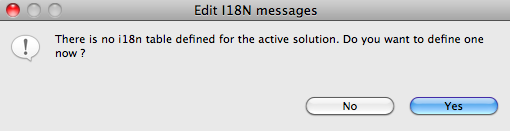 yet.
yet.
- Click Yes to continue. A list of available databases/tables will be displayed in a select window.
- Choose the appropriate i18n table or create a new i18n table, as applicable. The selected i18n table will open in Table Editor view. If you chose to create In case of creating a new table, it will also open a new table containing default i18n keys that ship with Servoy.
| Info |
|---|
Note: Changes made to i18n entries are locally saved to the workspace during development. The defined i18n table will then be added to the application server upon deployment of the solution. |
| Tip |
|---|
TipTip1: To change a solution's assigned i18n table at any time, select the solution in Solution Explorer to show the solution's Properties view. Then, double-click on the i18nDataSource line item in the Properties view and select the desired table from the pop-up browser that appears. Tip2: Create a single i18n database server connection and i18n table when having a solution that contains one or modules - this allows to add and/or change i18n values and/or keys from either the solution or any of the added modules. |
Externalizing a Solution
As mentioned previously, the Externalize Strings function adds internationalization to a solution by creating a list of all the items in your the active solution that are available for internationalization. It then generates i18n keys and messages from all the text properties in the solution (form objects such as button lableslabels, column titles) and replaces the hardcoded text with the i18n keys, with the default text being the original text property that was assigned to the item. 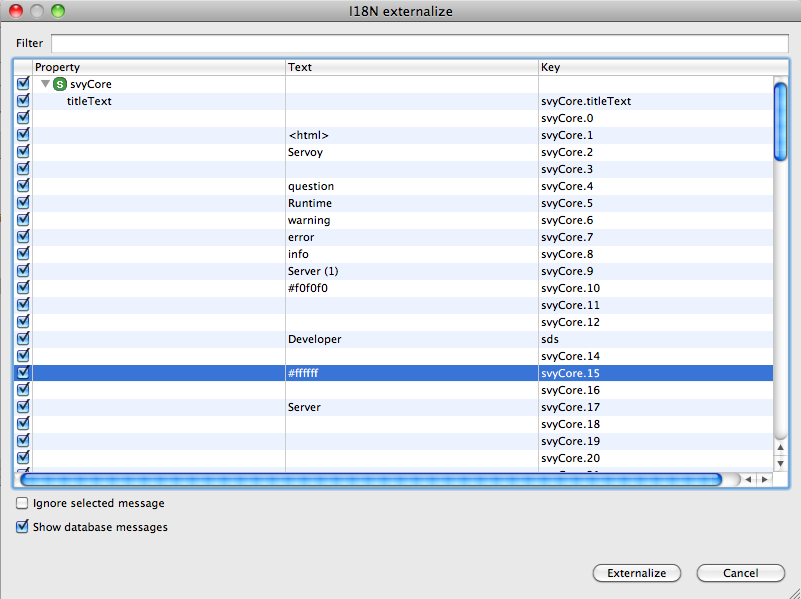 In addition to form objects, Javascript strings are included in the externalization, when present. These can be excluded from externalization using the Ignore selected messages underneath the externalize list. Once excluded, a comment is placed in the script that directs Servoy to skip these messages during future externalizations.
To externalize a solution:
- Choose either of the two options: (a) Click on the Externalize (1) button. Strings button on the toolbar or (b) go to Actions > Show Externalize Strings Dialog.
The i18n externalize dialog box will open, showing the following three columns (from left to right):- The text property to be externalized
- The hardcoded text that will become the default text
- The i18n key name to be assigned to the property
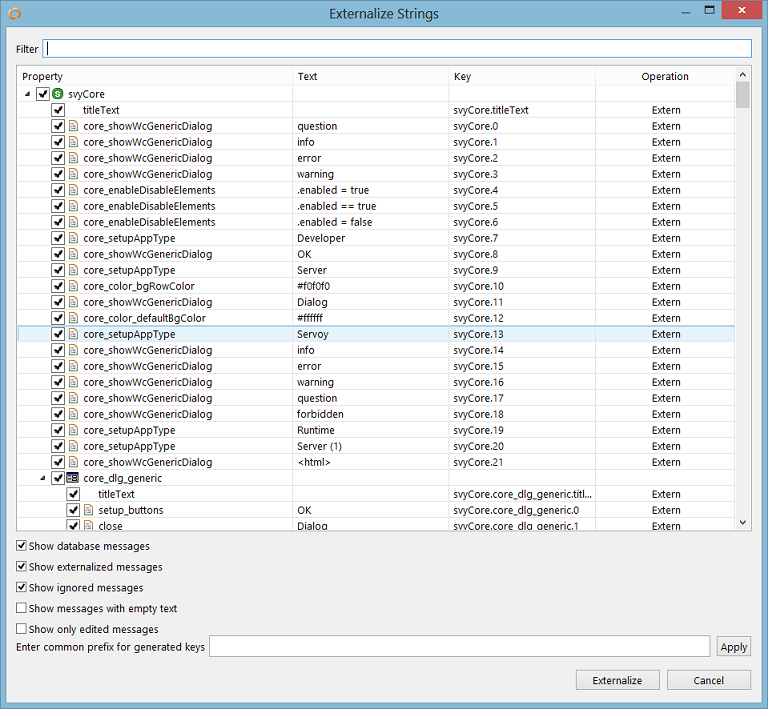
- Customize/edit the keys by double-clicking on a desired key, if desired.
- Deselect any items you do that are not wish desired to be shown in the list, hence not externalized, if applicable.
- Enter common prefix for generated keys, if desired. Click Apply for the prefix to be applied on the key values.
- Click Externalize. An externalize dialog will appear, showing the status of the externalize process. Once completed, this dialog disappears and all item properties will be converted to i18n keys.
Editing i18n
...
Messages
Internationalization can be added one by one to a solution by editing i18n keys in the i18n table using the Table Editor_._
To
...
view and edit an i18n table:
- Choose either of the three options: (a) click on the Edit
...
- I18N Messages button on the toolbar or (b) go to Solution Explorer > Resources > I18N files or (c) go to Actions > Show I18N Dialog.
In case of choosing (b) the Solution Explorer, either double click on the node itself or double click on the desired i18n file in the contextual list at the bottom of the Solution Explorer.
The i18n table will be opened in Table Editor view.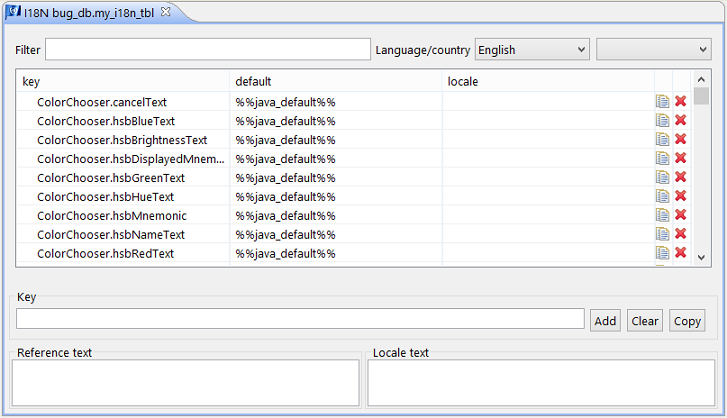
- Along the top of this view is a filter that enables users to quickly find a i18n key. The next two items at the top are the Language and Country drop-downs. To edit an i18n key:
- Select the key and the language/country to be edited.
- Click on the desired i18n key from the list.
- Enter the reference text (which is the default language text) and the locale text appropriate to that language/country.
- To add a new i18n key:
- Type in a name for the new key in the Key text box.
- Enter the reference text and the locale text in their respective boxes.
- Click Add.
Note that the i18n keys can be sorted ascending/descending on the key, default or locale columns by clicking on the header of the desired column.
I18n messages can be added to objects in both the Form Editor and the Script Editor:
- In the Form Editor, simply type in the i18n key where you one would normally type in the hardcoded text (for example, inside a text box or label, or via the Properties view in
text,toolTipText, ortitleTextproperties. - In the Script Editor, type in the i18n key inside the string in place of hardcoded text.
Setting I18N Globally
Internationalization can be set globally via preferences.
Go to Window > Preferences > Servoy > Internationalization to set default formats, language, timezone, I18N server and table.
When no i18n table is defined at solution level, the solution will use the global settings. Otherwise, the i18n settings at solution level will override the default preferences.
Importing / Exporting I18N Data
When importing a solution, the Import wizard provides options to import:
- All i18n data
- Only the new i18n language keys
When exporting a solution, the Solution Export wizard provides an option in the Choose export options page to export i18n data.
Overview
Content Tools
Activity