Page History
...
Quick start for the impatient
- Install Servoy Developer
- Install an Eclipse distribution that contains the plugin development tools for Eclipse (PDE), for example Eclipse Classic
- Setup a String Substitution variable named "servoy_install" which points to the installation directory of the previously installed Servoy Developer
- Create a ClassPath variable named 'WEBSTART' that points to javaws.jar of the used JVM
- Checkout the open source Servoy projects from https://subversion.servoy.com/product
- Download the Servoy Server libraries from http://build.servoy.com:8080/latest and place them in the "libs_extra" directory of the eclipse_target project. Download only the files who's name postfix matches the value of the release number in the ClientVersion class in the checked-out source code
- Setup a Target Platform by:
- Opening the servoy.target file, located in the "eclipse_target" project
- Make sure the entry for "${workspace_loc}/eclipse_target/libs_extra" display "(x of x included)", where x is equal to the number of libraries (.jar files) in the libs_extra directory. If not, force a refresh by selecting the entry, clicking Edit > Finish and then Control-S to save the editor
- Clicking the link "Set as Target Platform" of the Target editor
- Create a Launch Configuration (and directly start a debug session) by right-clicking the "Servoy Launch.launch" (or "Servoy Launch_mac.launch" when on OSX) file in the "launch_files" directory of the "com.servoy.eclipse.core" project and selecting Debug as > "Servoy Launch" (or Servoy Launch_mac when on OSX).
Installing Servoy Developer
...
Setup a connection to the Servoy SVN:
- Open the SVN Perspective: Window > Open Perspective > Other > SVN Repository Exploring
Note Installing an SVN Team Provider Installing an SVN Team Provider If the SVN Repository Exploring perspective is not available, most likely there is no SVN Team Provider installed. For more information on installing an SVN Team Provider see SVN Team Provider
- Add a new Repository Location: File > New > Repository Location
- Specify the URL 'https://subversion.servoy.com/product' and click 'Finish'

- Specify the URL 'https://subversion.servoy.com/product' and click 'Finish'
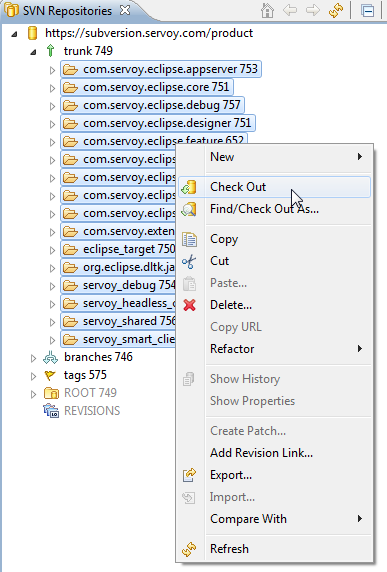
Checkout the Servoy projects:
- Expand the tree structure under the newly created Repository Location to the desired version to work on. Make sure to select the version of the projects that match the version of the previously installed Servoy Developer.
- Select all the projects
- Right-click one of the selected projects and select "Check Out" from the context menu
Download Servoy Server libraries
In order to also be able to start debug clients from Servoy Developer launched from the source code, it is required to use the correct version of several libraries of the Servoy Application Server. The latest version of these libraries can be downloaded from the Servoy build server, located at http://build.servoy.com:8080/latest. Download all the libraries from the subdirectory for a specific branch or for trunk who's name postfix matched the value of the releaseNumber variable in the ClientVersion class of the checked-out source code and place them in the "libs_extra" directory of the eclipse_target project
...
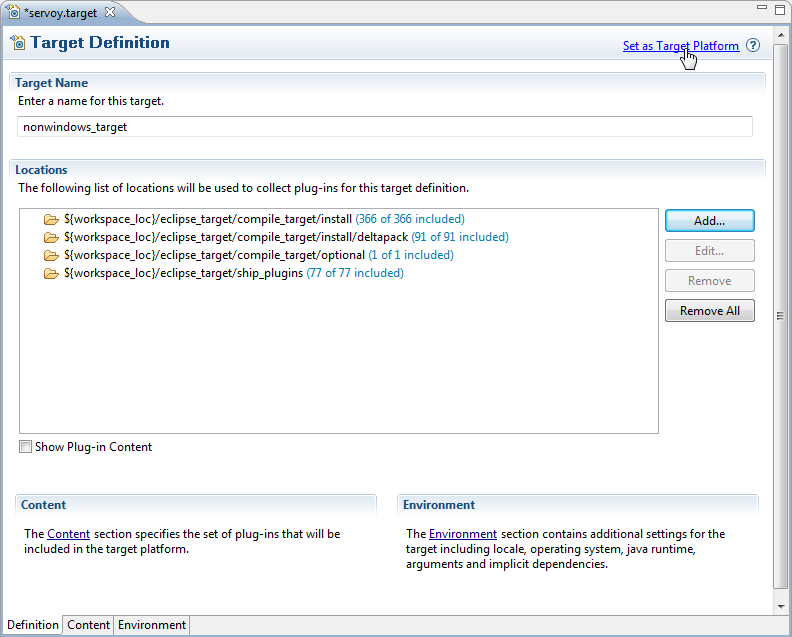
Setup the Target Platform:
- Switch to the Java Perspective: Window > Open Perspective > Java
- Expand the eclipse_target project in the Package Explorer
- Open (double-click) the servoy.target file
- Click the 'Set as Target Platform'. This will setup the Target Platform correctly, after which projects will be build and should compile without error.
Creating a Launch Configuration: Last step in the setup of the environment is the creation of a Launch Configuration.
...
- Install GWT plugin for Eclipse
- Run build_mobile_in_developer ant task from build.xml of servoy_mobile project (this will create the template war file)
- Refresh Workspace for Eclipse file system to see the war file
- Copy(Overwrite) mobile_xyz*.jar and mobileservice_xyz.jar from http://build.servoy.com:8080/latest
 to plugins folder of your Servoy install (where variable servoy_install points to). Download only the files who's name postfix matches the value of the release number in the ClientVersion class in the checked-out source code.
 - Run Servoy Developer
- From Servoy Developer, export mobile solution to folder: MyEclipseWorkspace/servoy_mobile/war
- Refresh servoy_mobile project from Eclipse workspace
- From context menu of servoy_mobile project run: Debug as -> Web Application (choose index.html as html file)
- Activate service solution in Servoy Developer
- In Eclipse, from Development Mode view, open the provided url in Chrome browser
- If GWT plugin for Chrome is not installed you will be prompted to install it; afterwards the mobile solution will run, breakpoints can be put in java classes of servoy_mobile project
Overview
Content Tools
Activity