Servoy is a plugin for the Eclipse platform, so to develop the Servoy codebase an Eclipse SDK environment with Eclipse Plugin development facilities is required.
Download & install
In order to get started with development on one of the open source Servoy projects, the following is required:
- A Servoy Developer installation, with the SQL Explorer plugin installed
- A separate Eclipse environment with the Eclipse plugin development tools installed
- Configuration of the Eclipse installation
Installing Servoy Developer
The installer for Servoy Developer can be downloaded after login in at http://www.servoy.com/download. Running the installer will install Servoy Developer.
For a more indepth description of installing Servoy Developer, see Installing Servoy Developer|.....||||\
After installation, start Servoy Developer and install the SQL Explorer plugin. See [] for more information.
Installing Eclipse with the Eclipse plugin development tools
Teh open source Servoy projects are all plugins for the Eclipse environment, so in order to develop on one of the projects a Eclipse version with Eclipse plugin development tools installed is required.
The Eclipse.org download page (http://www.eclipse.org/downloads/) lists a wide range of prepackaged Eclipse distributions, one being the 'Eclipse for RPC/Plug-in Developers'. Although the plugin development tools can be installed in any Eclipse environment, the easiest is to download the 'Eclipse for RPC/Plug-in Developers' distribution and install it.
Configuration
Start the Eclipse installation and choose or create a workspace into which the development on open source projects of Servoy will take place.
The following configuration needs to be done:
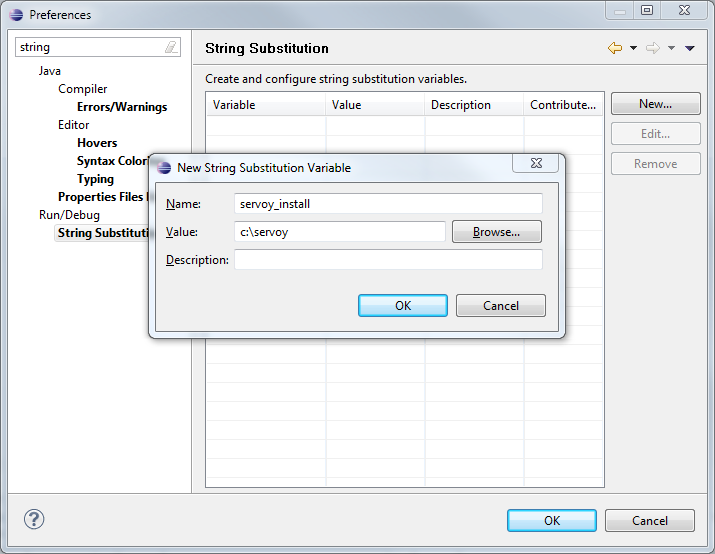
- Setup a variable: Go to Window > Preferences > Run/Debug > String Substitution and create a new variable named 'servoy_install' with the value of the directory where Servoy is installed.
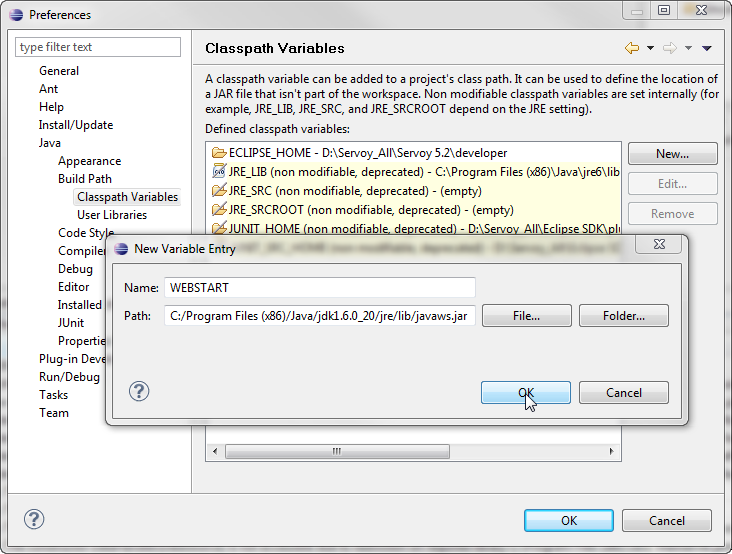
- Create a classpath variable: Go to Window > Preferences > Java > Build Path > Classpath Variables and create a new variable named 'WEBSTART' with the value of of javaws.jar in the Java installation.
- Setup a connection to the Servoy SVN:
- Open the SVN Perspective: Window > Open Perspective > Other > SVN Repository Exploring
- Add a new Repository Location: File > New > Repository Location
- Specify the URL 'https://subversion.servoy.com/product' and click 'Finish'

- Specify the URL 'https://subversion.servoy.com/product' and click 'Finish'
- Checkout the Servoy projects:
- Expand the tree structure under the newly created Repository Location to the desired version to work on.
- Select all the projects
- Right-click one of the selected projects and select "Check Out" from the context menu
- Setup the Target Platform:
Installation & setup
- Download & install Servoy Developer.
- Download & install a version of Eclipse with Eclipse Plugin Development features installed (Eclipse SDK)
- Start Eclipse SDK and create a new Workspace
- Install an SVN plugin
- Checkout the Servoy Codebase from SVN
- Add a new target platform (Preferences > Plugin Development > Target platform > add).
- Add a Location under "Locations" of type "directory" and point it to the developer directory of the Servoy Developer installation
- Create a new Debug Launch configuration (Run > Debug Configurations)
- Select the "Eclipse Application" node and click the "New launch configuration" button
- On the "Main" tab:
- Provide a Name
- Specify a workspace location under "Workspace Data" by clicking "File System". Select the workspace containing your Servoy solution projects
- select 'com.servoy.eclipse.core.ide' under "Main" > "Program to run" > "Run a product"
- On the "Arguments" tab:
- Point "Working directory" > "Others:" to the developer directory of the existing Servoy installation, by clicking the "File system" button
- Apply the changes
*Debugging using Eclipse Plugin Development facilities:*
Plugin/bean development using the Eclipse Plugin Development facilities means that Servoy Developer is started from within a Eclipse instance that has the Eclipse Plugin Development features installed (called "plain" Eclipse from now on).
The plugin/bean project is located in the "plain" Eclipse instance. When it's time to debug the code, the Servoy Developer Eclipse instance is launched as a debug process from within the "plain" Eclipse instance.
The Servoy Developer Eclipse instance is a full featured Servoy Developerhat can be used to create/alter solutons, start Debug Clients, create and debug JavaScript code etc. If any code is executed that is part of the plugin/bean project in the "plain" Eclipse instance and it contains a breakpoint, the Java debugger in the "plain" Eclipse instance will be activated and thus the plugin/bean code can be debugged.
Debugging
To launch a debug session the first time, it is required to go through the Debug Configuration dialog:
* Run > Debug Configurations > select the previously created Debug Configuration and press the "Debug" button
On subsequent launches the Debug Configuration will be accessible through the Debug History (available through Run > Debug History or the debug button on the toolbar)
Memory settings
Memory settings for the debug session can be set on the "Arguments" tab of the Debug Launch Configuration. It is advised to specify here the same memory settings as applied in the servoy.ini file of your Servoy Developer installation (Default: -Xms40m -Xmx256m -XX:MaxPermSize=256m)
Download Servoy
Download Eclipse SDK
Overview
Content Tools
Activity